Out of the box – Vol. 3

Out of the box – Vol. 3

Index

IntroductionOur researchWhy cellulose based insulation?Why lime instead of cement?Cardboard+lime insulationMaking and applyingConclusions and further steps

Introduction

In recent decades, we have seen many examples of individuals and collectives striving for a greener way of building: reviving traditional methods, favouring natural materials or including recycled elements in the process to limit the footprint. Critical Concrete embraced this aim from the beginning: in 2017, we started experimenting with cardboard based insulation, and since then we have been working with other materials (such as wool or mycelium) that can serve as valid alternatives to the more polluting conventional ones.

This article presents our journey and experience researching and developing prototypes for cardboard-lime based insulation. We will talk about why we decided to dig deep in lime and cellulose based materials, and what we learnt from our prototyping. Our research aims to deepen the recycled paper and cardboard potential as top sustainable insulation material.

Interested in using this technology in your project?

Critical Studio can help!

Learn More!

Our research

More expensive rents means more people having to live in precarious houses1. Housing poverty is one of the leading global issues2, affecting more and more people in the face of climate change. The lack of thermal comfort causes serious health issues, and is responsible for many preventable deaths especially among vulnerable and low-income communities.

housing deprivation portugal eurostat

In Portugal, where we are based:

Almost 20% of people claimed to be unable to keep their home adequately warm during winter.335.7% said their house is not comfortable during summer.4In 2018, at least 1 in 5 people lived in a dwelling with a leaking roof, damp walls, floors or foundation, or rotting window frames or floor.5

Our priority is to improve housing conditions through affordable and environmentally friendly solutions. This is the main reason our research lab has been focusing on insulation methods for many years.

We started experimenting with cardboard in 2017 due to the high performance of cellulose insulation. Our research began considering the advantages and handicaps of using corrugated cardboard as an insulation panel. So far, we produced boxes and panels for a low-tech insulation system and applied it in different summer school houses, in cases the insulation could not be applied on the exterior of the house (houses in line, no space in the street, etc.).

Last  year, we decided to move forward in our research and try to find a method to continue producing cellulose based insulation but on a larger scale, since we wanted to continue developing an insulation that would be mineral-based and would not need to be covered by a plywood board or equivalent.

Why cellulose based insulation?

Cellulose is the organic compound mainly used to produce paper and cardboard, and other wide varieties of derivative products. It works as a very competitive insulation material, “depending on manu- facturing and method of installation and is comparable with other types of insulation. It has an average thermal conductivity being of about 0.040W/mK (similar to glass wool and rock wool insulations)”.6

Paper and cardboard are extensively used and abundant resource. Reusing and recycling cardboard locally7 also reduces emissions substantially:

In 2016, 50 660 000 tons of paper and cardboard wastage were produced in the European Union. Almost one million (905 137 tons) just in Portugal.8That year, within the EU, 72% of that waste was recycled. Whilst in Portugal the percentage was 55%.9

This means that we may take advantage of a material with high insulation performance and avoid it to become disposal waste at the same time, adding a new step in its life cycle.

There are many examples of people working with cellulose based materials, as the known papercrete, which since the ‘90s has been used in informal bio-constructions around the world. Papercrete is the building material made of paper pulp and cement. The main advantage of it is “that it is lightweight but sturdy enough to bear loads10. But we didn’t want to use cement.

Why lime instead of cement?

Cement became especially relevant during the industrial revolution and it has changed our way of building from that moment. Nowadays, as an affordable and easily accessible material, cement might seem like the perfect solution to achieve efficient results quickly. However, the environmental impacts of the material are very concerning.
The most well known fact is the excessive CO2 emission of the cement industry, as it occupies 3rd place of global CO2 emissions11. But even if emissions dropped gradually with innovation efforts to create the green concrete12, we are not sure if the industry will ever be fully sustainable and carbon-neutral.

Why? Because the environmental harm does not stop with CO2 emission. We have to keep in mind:

other additives in the material’s production,excessive water usage (both during cement production and construction with concrete), centralized production, lack of perspirability of cement forces the combination with other unbreathable, synthetic materials.complexity/impossibility of recycling concrete, often reinforced, combined with lightweight materials, or in complexe composite materials,that concrete surfaces trap heat and prevent rainwater absorption,

That makes cement the ultimate enemy in sustainable architecture. It is time to opt for alternatives. To reduce our environmental impact, we put our votes to use lime: in contrast to cement, lime is biodegradable and fully-recyclable (even on bricks), and most of the time, locally produced.

A more detailed article on cement will be published in the upcoming weeks, stay tuned!

Cardboard+lime insulation

Key concepts

Cardboard pulp: Cardboard soaked in water for at least 12 hours, and then squeezed and mixed with an electric mixerCardboard+lime paste: The whole mix we used for our prototypes. Its composition changed over time as described below.Quicklime: Calcium Oxide. CaO. The outcome of heating limestone. Slaked lime: Hydrated lime. Ca(OH)2. It is the paste result of putting enough water so that the quicklime combines chemically with it.Natural hydraulic lime: Ca(OH)2+reactives. It is used to make mortar which sets through hydration.

Since this last year, we have been working on what we call cardboard+lime, based on papercrete in which we swapped cement with lime. Our goal of producing insulation allows us to use a non-structural, but less harmful material. In the first experiment, we mixed lime and cardboard14 in a small brick shape which looked very promising in terms of resistance. We were really curious about what we could get from there.

The first question that appeared was which shape should we give to these prototypes: Should we continue with bricks? Should we try with panels? In our previous research, the amount of time that producing panels takes was one of the biggest handicaps, so we decided to look for a way to remove this step from the process. We opted for making shuttering molds and applying a cardboard+lime paste in situ.

First prototypes

We have made many prototypes, have learnt different new things from each one and have tried to improve in each new attempt. The second cardboard+lime paste was made from recycled cardboard that we got from Lipor, water, sand and natural hydraulic lime (NHL) and was applied in a temporary wooden formwork of 1 m2 and 8 cm of thickness.

cardboard lime insulation timeline

Recipe and setting process

We started with a basic mix made of (proportion in volume):

Cardboard15 pulp70%Sand 20%NHL 5 1610%

That first trial gave us an overview about the outcome we wanted to have and what was missing. In the following prototypes, we added borax for added resistance to fungi and mould. We also increased the proportion of hydraulic lime, reducing the sand; this made the mix easier to mix and apply. We got a better consistency in the cardboard+lime paste and we could notice it during the curing: the prototype was more compact and homogeneous.

Over time, we saw a small shrinkage up to 2% of their sizes and the terrible appearance of mould on the second and third prototypes. The cardboard+lime paste shrinks because of the amount of cardboard pulp –it tends to shrink when it loses its water– in the final mix; and the mould appears because of the slow setting process.

How did we try to solve this?

Adding slaked lime in order to kill any kind of life that wanted to appear.Adding plaster to accelerate the curing process.Reducing the percentage of cardboard pulp.

Thus, our final cardboard+lime recipe got its shape (proportion in volume):

Cardboard pulp62%Sand15.5%NHL 515.5%Slaked lime2.3%Plaster2.3%Borax2.3%

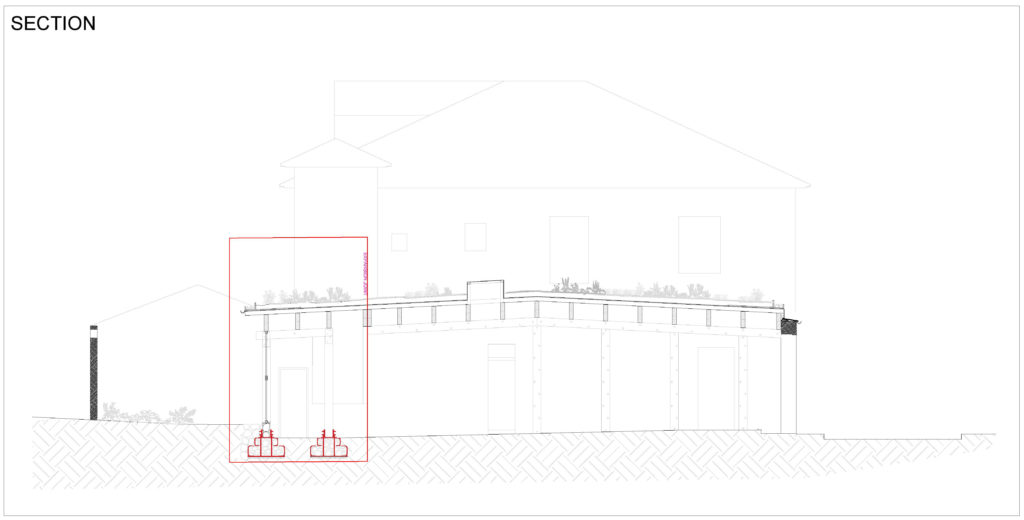
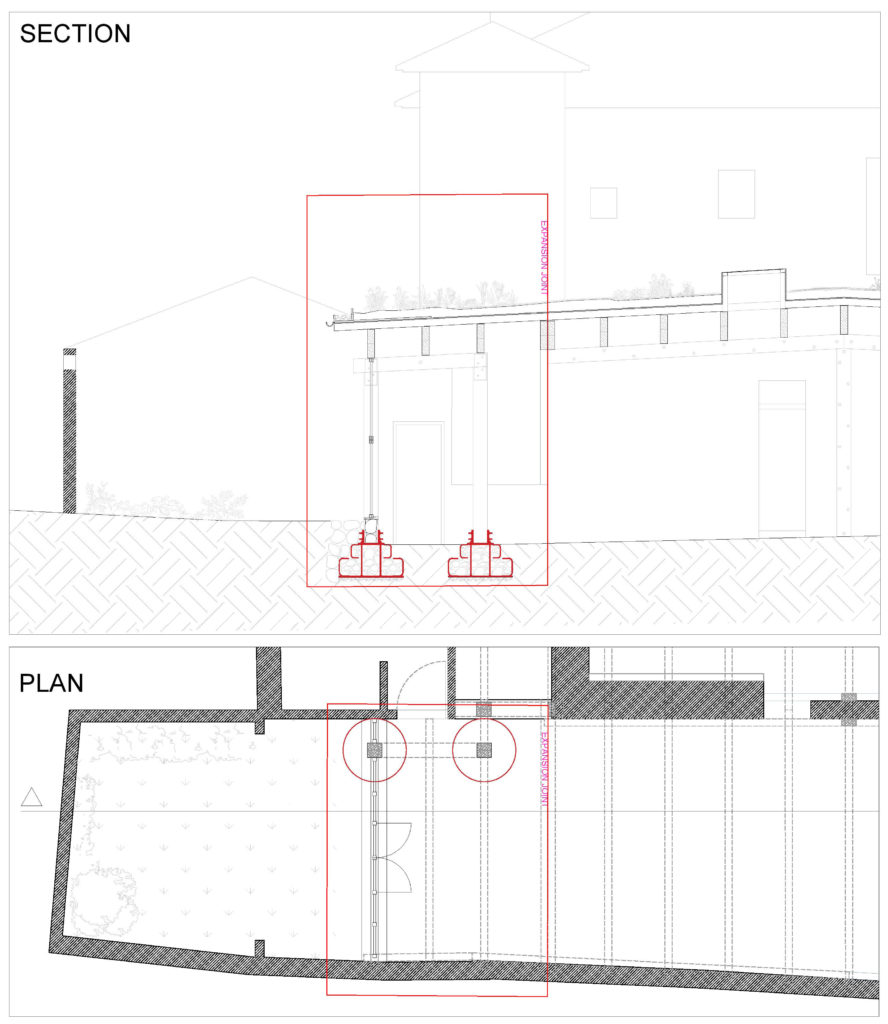
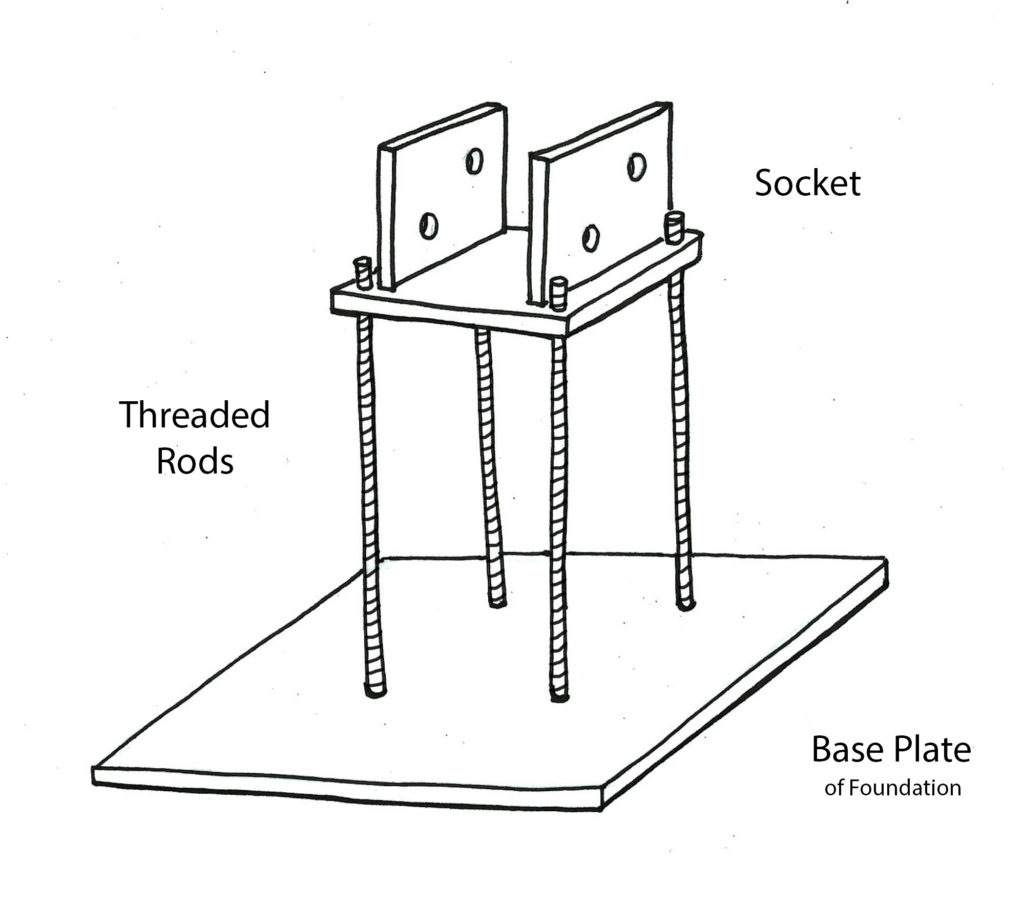
Shuttering and structure

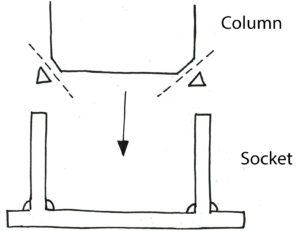
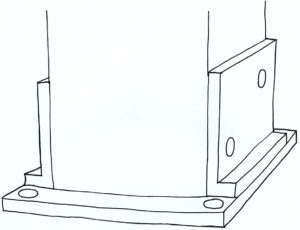
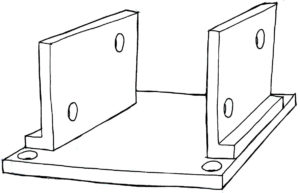
In the beginning, the shuttering was thought of as a temporary structure –such as those we can see for making concrete– compound of vertical wooden pillars and boards. After the first prototype, we realised this was not feasible if we wanted the cardboard+lime to be a solid and permanent insulation attached to the wall.

In order to achieve a safe insulation that could last for years in place, we designed an internal structure secured to the vertical one and the wall in such a way that only the boards were removable. At the end, we decided to also add interior beams to completely ensure the cardboard+lime insulation.

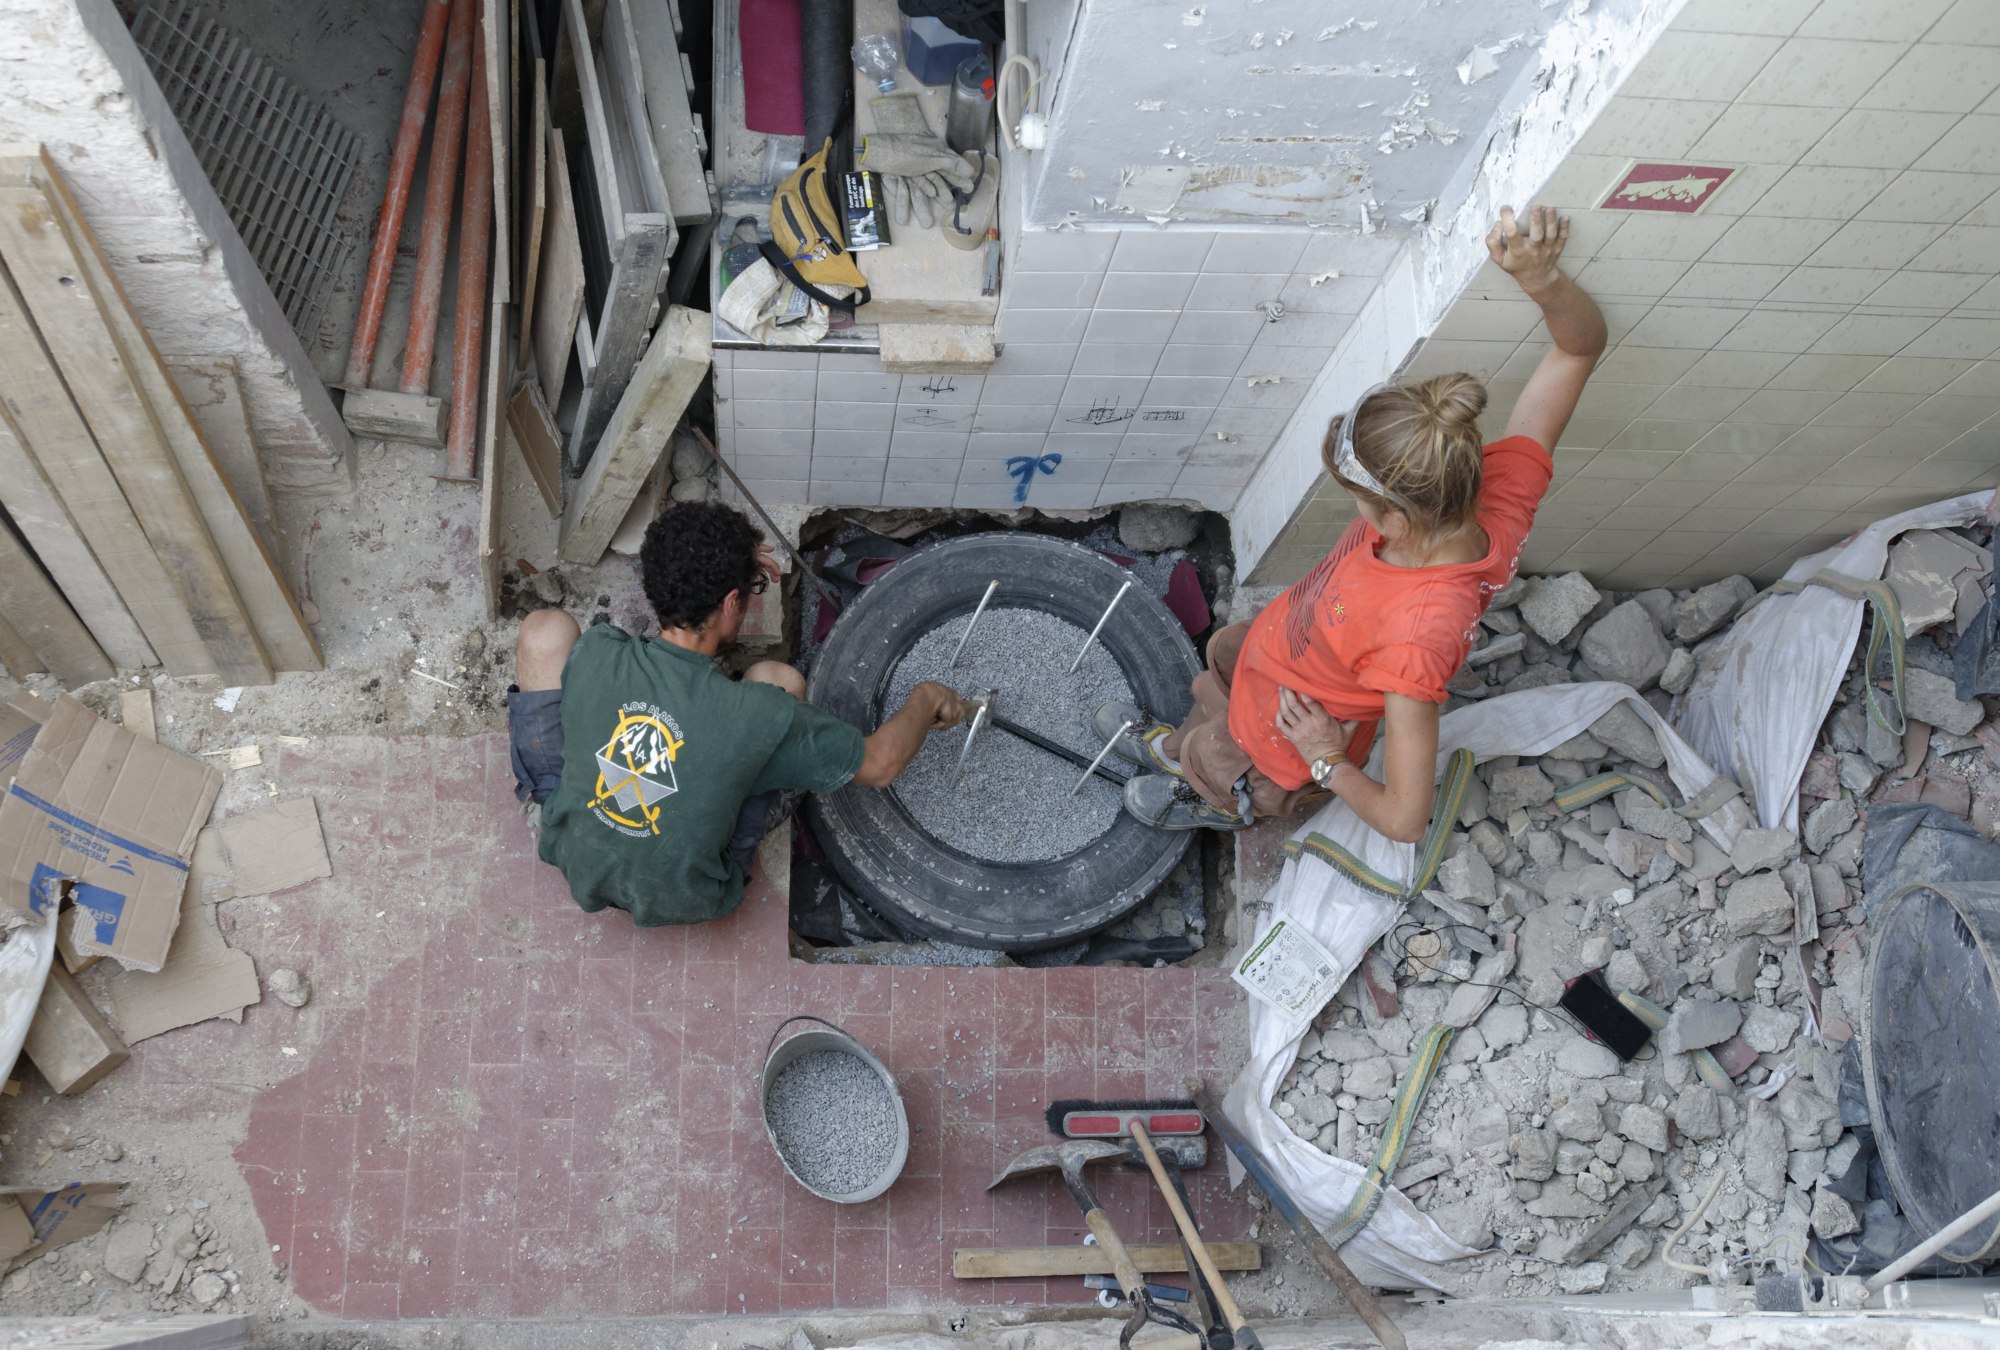
Making and applying cardboard+lime

As the recipe and the structure evolved over time, so did the production process.. With the addition of new structural elements, such as the inner string and beams, the procedure became more complex.

We had to follow a step by step process in which the use of one tool or another could save us a lot of time, as well as the outcome could change completely if it was not followed properly. Furthermore, the setting process could be slashed depending on the context: are we working during Summer? Are we working in a humid zone? Do we have enough ventilation? And with it, the properties of the insulation.

How to make the cardboard+lime insulation
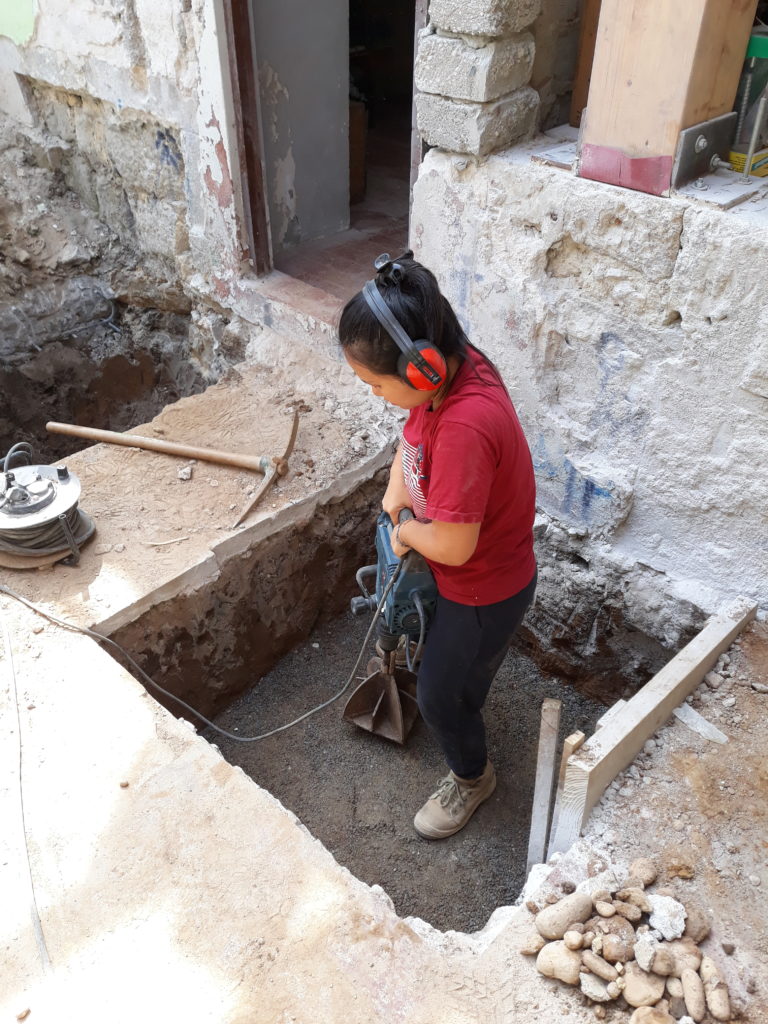
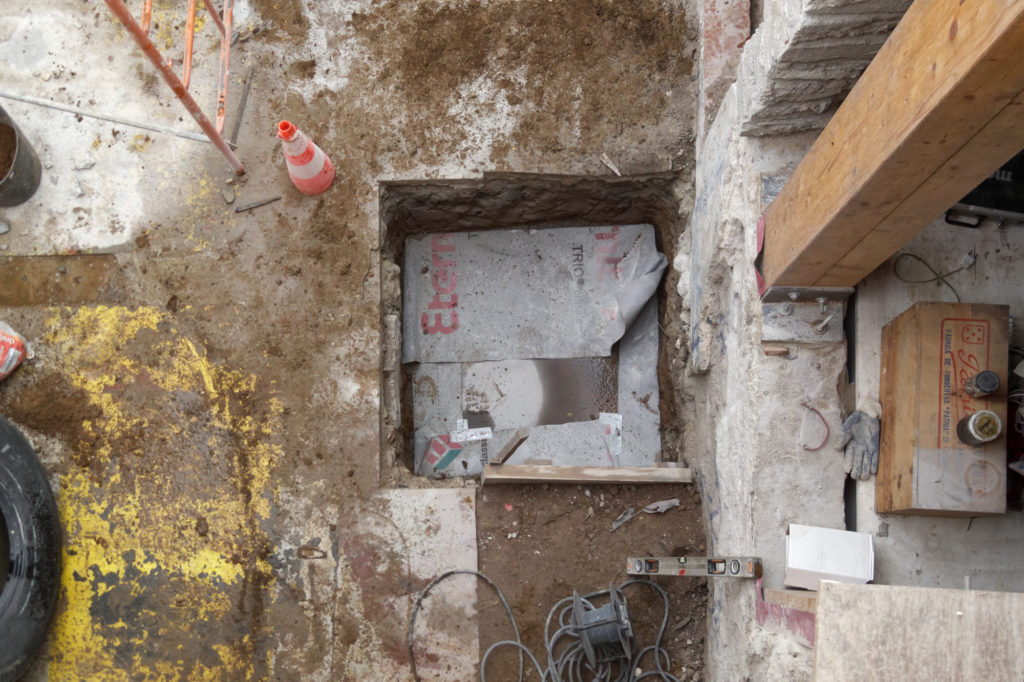
Disclaimer: Calculation for 1 m2 insulation. First, measure the whole wall you want to insulate and divide it in the best way it can fit. Also, if you are making the insulation in a stone/concrete wall, mark and make all the holes you will need.

Cardboard+lime paste – with the proportion referred before

For making the cardboard+lime paste we need to first prepare the cardboard pulp and the slaked lime (you can buy ready-made lime putty, but we used to make it ourselves).
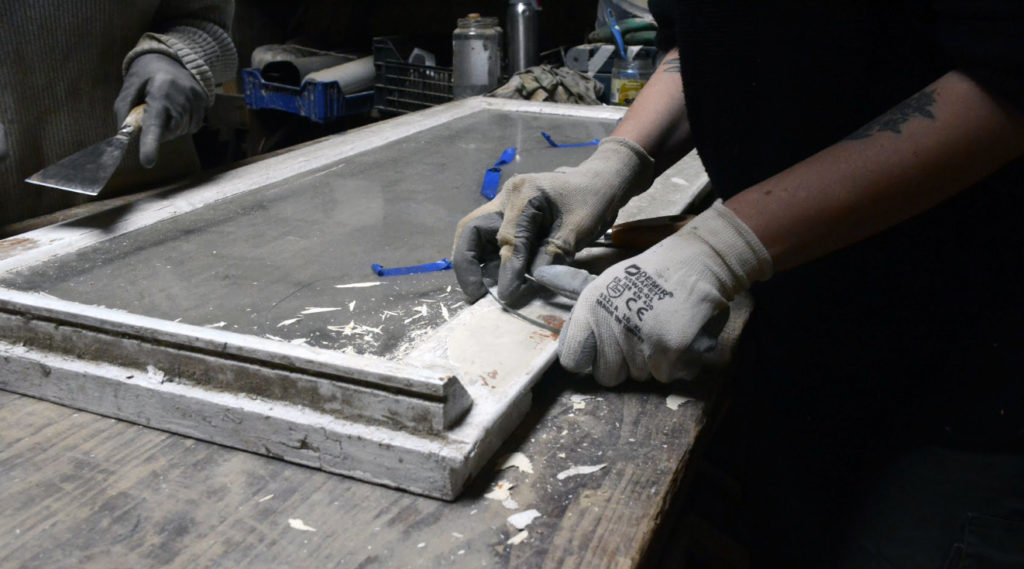
Slaked lime

This is a dangerous chemical reaction, so we advise to use goggles, mask and gloves.


In a large metal container –nothing plastic though, as the heat generated by the reaction will melt it–, add one part quicklime to three parts water.Always add quicklime to water, and never water to quicklime, as it will spit, and can be very dangerous.The reaction should start and it can achieve temperatures over 100ºC.Wait until cooled down. Usually we prepared the mix at least one day in advance.

Cardboard pulp

For 1 m2 of cardboard+lime insulation, 6 cm thicker, you will need 65 l of cardboard pulp.


Tear/shred the cardboard into 4-5 cm pieces and drop them into a bucket until almost full.Pour enough water into the bucket to soak the cardboard pieces.Let the paper soak for at least 12h (and no more than 48).Attach the mixer to the drill and move it around in the cardboard to shred it to a pulp.Squeeze and reserve.

After having these two ingredients ready, we can start the mix!

In a concrete mixer, put half of the cardboard pulp, the hydraulic lime, the sand, plaster, borax and the slaked lime.Start the machine and add the rest of the cardboard pulp little by little to get a better mix.If you see the mix becoming small balls, stop and tear them apart. Mix again until having an homogenous mix.

Applying the cardboard+lime paste

For the shuttering we use 6×6 cm wooden bars and 100×33 cm plywood boards.

cardboard lime shuttering structure
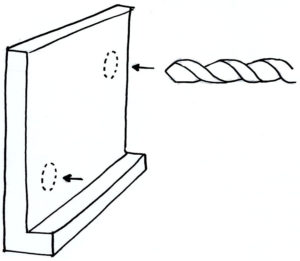
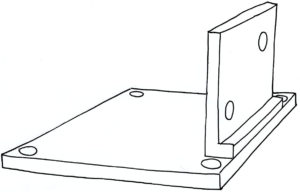
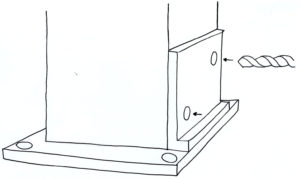
Make the frame where the shuttering will be placed. Mark where the structure is going to be placed. Place a bar horizontally on the floor (a), attach it to the wall with screws. Place two bars vertically (b) with 1 m separation between them. Measure from the axis of each bar. Attach them to the wall with screws.Put four screws (c) drawing a ‘z’, two of them on the vertical bars with ~20 cm distance and the other two on the wall at the same high. Tie a string (d) ]to the first screw – the one closer to the horizontal beam on the floor–.Stretch the string to the next screw –the one at the same high that the one before–. Don’t tie the string because we will need to tight it later.


Screw the wooden board to the pillars.Start pouring the cardboard+lime paste until it covers the string. Press the paste.Tight the string.Pour more cardboard+lime paste.Stretch the string to the third screw, in diagonal.Pour more paste. Press it. – The more you press, the better.Tight the string, stretch it to the last screw on the pillar. Put a beam with nails (e) small beam]. Press.Repeat from point 2.

Setting process

Remove the boards after 3 days. There is no risk of downfall, but the cardboard+lime paste is still wet so be careful not to beat it. The setting process can last for many weeks until the insulation is completely dry, but with the proper conditions it should be around 3 weeks. During these three weeks the insulated room must be well ventilated – cross ventilation is always the best- to avoid the condensation and with it, the slowed down of the curing process.

Conclusions and further steps

After almost one year of researching and observing the behaviour of the different prototypes, it seems fair to say that cardboard+lime, with the recipe shown above, is indeed proven to be a promising insulation material.

But we ended on a process that is a bit crazy. We realized that applying cardboard+lime as we did needs specific conditions and a meticulous procedure. So, yes, for experienced building people cardboard+lime in this shape may work as an eco-friendly low-tech material. Nevertheless, our aim is to give to our society a environmentally friendly insulation material accessible for all.

How to store food outside of the fridge

Thus, now that we know that the material works, we are working to improve its shape. In our last prototypes, we decided to re-think the brick shape and made two blocks of 36x23x7.5 cm and one of 40.5x.17.5×3 cm. The outcome looks auspicious: easier process of making, less time to dry and highly resistance after the curing process.

The next steps include coming back to the panels with a hydraulic press that may allow a faster curing process and more consistent and resistant material. We keep working in this direction to maximize the potential of this insulation.

Notes and references

1 Marques Costa, R. (2019) Crise na habitação empurra mais pessoas para casas sem condições mínimas. Publico (PT) – https://www.publico.pt/2019/05/25/sociedade/noticia/ha-viva-condicoes-precarias-sao-realidades-escondidas-1873884

2 Habitat for Humanity (year) 7 things you should know about poverty and housing. https://www.habitat.org/stories/7-things-you-should-know-about-poverty-and-housing

3 Eurostat (2019), Inability to keep home adequately warm – EU-SILC survey. https://ec.europa.eu/eurostat/web/products-datasets/-/ilc_mdes01

4 Eurostat (2012), Share of population living in a dwelling not comfortably cool during summer time. https://ec.europa.eu/eurostat/web/products-datasets/-/ilc_hcmp03

5 Eurostat (2018), Total population living in a dwelling with a leaking roof, damp walls, floors or foundation, or rot in window frames or floor – EU-SILC survey. https://ec.europa.eu/eurostat/web/products-datasets/-/ilc_mdho01

6 C.-M. Popescu, D. Jones (2017) Cellulose, pulp and paper. Jones, D. Brischke, C. (Eds.) Performance of Bio-based Building Materials. [pp.75] https://doi.org/10.1016/C2015-0-04364-7

7 China Impacts Price of Recyclable Cardboard. https://www.phswastekit.co.uk/blog/posts/10-07-2019/-china-impacts-price-of-recyclable-cardboard

8 Eurostat (2016), Generation of waste by waste category, hazardousness and NACE Rev.. https://ec.europa.eu/eurostat/web/products-datasets/-/env_wasgen

9 Eurostat (2016), Treatment of waste by waste category, hazardousness and waste management operations. https://ec.europa.eu/eurostat/web/products-datasets/-/env_wastrt

10 Nubie, S. (2019) How to make papercrete: the ultimate building material for off grid living. Homestead Survival Site. https://homesteadsurvivalsite.com/how-to-make-papercrete/

11 Andrew, R (2019), Global CO2 emissions from cement production, 1928-2018, Center for International Climate Research. https://doi.org/10.5194/essd-11-1675-2019

12 IEA (2019), Tracking Industry, IEA, Paris. https://www.iea.org/reports/tracking-industry/cement

13 Recycled cardboard provided by Lipor – local trash collector company.

14 Over time, we realised that cardboard sweats the ink printed on it, so then we tried to avoid printed parts as much as possible.

15 Natural Hydraulic Lime NHL 5 NP EN 459-1.

The post Out of the box – Vol. 3 first appeared on Critical Concrete.

Natural Wood Protection

Natural Wood Protection

Interested in learning more about this topic and more social and sustainable ways of doing architecture? Apply now for our Postgraduate!

jQuery(function() { _initLayerSlider( ‘#layerslider_20_zvknsy4vfdqj’, {createdWith: ‘6.11.2’, sliderVersion: ‘6.11.2’, skin: ‘v6’, navPrevNext: false, hoverPrevNext: false, navStartStop: false, navButtons: false, showCircleTimer: false, skinsPath: ‘https://criticalconcrete.com/wp-content/plugins/LayerSlider/assets/static/layerslider/skins/’}); });

DISCLAIMER

This article explains how to protect wood from pests, water and fire showing different environmental-friendly techniques

!UPDATE! !UPDATE! !UPDATE! !UPDATE! !UPDATE! !UPDATE! !UPDATE! !UPDATE!

DE BLOWA

UseProtectionLimitationInterior & exterior wood,
termites-infested woodKilling and repelling termites and other pestsIf a change in colour is not appriciated

DE BLOWA is a mixture of proven anti-termite and anti-pest ingredients that we at Critical Concrete used to protect almost all of the wood we use. So far, we haven’t done any long-term research into its effectiveness, but we’re optimistic that it’s a very useful combination because all of the ingredients are individually useful treatments for pests. The name is an abbreviation for the materials it contains:

DEDiatomaceous Earth100 gB
Borax100 gLLinseed Oil3 kgOOrange Oil100 gWAWood Ashes100 g

It is important to shake the mixture well before application, as the ingredients are not dissolving and settling on the bottom of the container. Then the mixture can be easily applied with a brush (or for a larger surface with a paint roller). Users should be aware that DE BLOWA gives the wood a darker shine. If a fine result is required, the excess should be removed a few minutes after brushing with a cloth.

ProTip: If the wood is already infested, it is recommended to briefly pull the wood through fire from all sides to kill the termites. Another option is to inject orange oil into the visible termite tunnels with a syringe. Read more about the single ingredients and techniques in the following article!

Interested in using this technology in your project?

Critical Studio can help!

Learn More!

Introduction

Wood is a versatile and renewable material with a positive carbon footprint, which proves to be a significant construction material in sustainable architecture. Because of its strong and lightweight characteristics and the possibility to be processed and worked easily, it is a good replacement for other, less ecological materials. Additionally, wood is a relatively cheap material and gives any construction a cozy and natural atmosphere.

All these advantages make wood one of our most used materials within our projects. For example, instead of concrete or metal, the heavy load of our green roof is carried by strong wooden laminated beams of 12x48cm. Also, reclaimed wooden windows are giving a unique touch to the backyard facade of our workshop.


Beams carrying the green roof

The facade in process

Despite the mentioned advantages, wood as a building material still faces some persistent prejudices, which can lead people to refrain from using wood in their constructions. Many bacteria, fungi and insects find wood appetizing, and humidity and moisture can lead to its early decay. Besides this, a misconception associates wood with being very flammable and thus, a risky building material (when in fact wood retains its strength longer and at much higher temperatures than steel [1]). So, if wood is prepared and treated in an appropriate way, it can be turned into a long-lasting, water- and bacteria-proof as well as fire resistant building material. Many still-standing examples prove that wooden structures can last over centuries and, taking their time of origin into account, that wood can be protected without any artificial products.

Faroe islands
House on the Faroe Islands

When it comes to protecting wood from the mentioned dangers, one can already find a lot of articles on the internet. In this article we avoid the commonly used methods which often involve ingredients harmful to the environment and instead focus on the natural and non-toxic techniques. Besides, we want to promote and facilitate the usage of reclaimed wood. The basics of how to prepare reclaimed wood for the prevention technique can be found at the end of the article.

Based on our experience and research, this article aims to give guidance regarding sustainable and environmentally-friendly techniques to protect wood against pests, humidity and fire. What techniques fit best for your projects can be traced in the decision tree below.

Protection Techniques

Exterior and interior wood are exposed to very different conditions. Whereas both need to stand fire and pest, the wood outside is prone to much more risks as it may have to withstand heavy rain, persistent humidity or high-levels of sunlight radiation. In our projects we usually use applying borax and linseed oil for interior wood and the Japanese technique of charring wood (shou sugi ban) for exterior wood. Depending on the conditions of the property and on the available resources, a combination of techniques may be suitable.

CHARRING WOOD

UseProtectionLimitationExterior and interior wood;
preferably cedar, pine, marble, hemlock or oakagainst humidity
against pests and fungi
enhancing fire-resistance
sunlight-protectionnot suitable for glued and easily cracking wood

Charring Wood is a Japanese technique which originated in the 18th century, known as Shou Sugi Ban. The surface of the wood is burned until carbonation of the surface. The finished result is called Yakisugi. We already published an article about the technique’s history and contemporary use in architecture today, check here.

Counter-intuitively, charring wood has several astonishing advantages without involving any chemicals. The idea is to burn the surface of the wood without combusting the whole piece. Besides giving the material an interesting and unique look, the process lead to a triple protection:

fire protection – this might seem counter-intuitive, but the burning of the surface starts a carbonation of the material and thus lower the thermal conductivity. The treated material will take more time to burn in case of a fire than the regular wood.
termite and mold protection – burning wood destroys the nutritional value to insects and fungi, that regular wood gives to these species. Thus it helps to prevent the propagation of pests.
water protection – the enhanced carbonation gives the charred layer a waterproof resistance, as water slips on burned wood like over an oily surface.

TRADITIONAL STYLE
(suitable for a certain amount of similar boards)

Traditionally the technique is used with Japanese cedar. Cedar is usually the easiest species to burn because of its natural chemical properties and wide grain patterns, making it a more porous wood. In the last few years, the technique has been popularized in western countries and extended to other species of wood like pine, hemlock, maple, or oak. We used pine and beech, but we experienced that these species tend to show cracks when charring. Before burning other species of wood than the ones mentioned above, it is advised to research on previous experiences or make small prototypes. It needs to be mentioned, that once the piece gets charred, it may contract slightly and change its shape as it loses humidity. If working with very precise measurements, this needs to be kept in mind!

Following, the article is highlighting different approaches to do the burning process. For both it is recommended to choose a well-ventilated place, preferably outside, but to avoid breezes. Safety measures should include a nearby fire extinguisher, a bucket of water as well as fire-resistant gloves. Wearing flammable clothes like polyester, sawdust or any flammable items within the close surrounding must be absolutely avoided.

Traditionally in Japan, shou sugi ban is performed by bonding three planks of wood to form a long triangle and starting a fire in the resulting tube. This technique is suitable to char a bigger amount of similar boards (e.g. for cladding). The easiest way to create this triangle is to place the three boards next to each other on the ground with facing the sides to be charred upside and then folding the two outside boards upwards. The triangle can be easily fixed with wire.

One possibility is to put the triangle on a non flammable floor and start the fire at the opening at one side of the triangle. In the best case, the fire spreads over within the whole tube and it will take a few minutes to char the surfaces of the wood. Once the surface is sufficiently burned, the planks are separated and thrown to the ground to stop the burning [2]. The other possibility is to start the fire while the triangle is standing up. Therefore a stable and fire-resistant base (e.g using bricks) is advisable, best next to an also fire-resistant wall. Besides, a fire-resisting spot where the hot and probably still burning triangles can be placed later, needs to be prepared. The wooden triangle can be placed in a slight angle to the wall and the fire can be started inside the lower opening of the triangle. It is also possible to put a grill on the fire-resistant base and start a fire in there, keeping the fire slightly smaller than the hole of the triangle. That way the triangles can be just put on top of the fire and the process will be started. Once the bottom part of the tube catches fire, the fire will make its way to the top. After some minutes fire shoots will be visible on the top and after waiting another minute the triangle can be removed with fire tongs. Once the wood is placed on the prepared spot, the fire can be hosed off with water [3]. 

As it is can be an unhandy task to fix and loosen the triangles, we are working on a technique to facilitate the process. We are building a burning station, where you can easily put wooden boards and start a fire underneath. When the station will be refined, we will share the methodology and tools in another short article and in a YouTube-Video!

ADAPTED STYLE WITH A HANDHELD BLOW TORCH
(suitable for every form)

If the wood does not come in similar boards or if you do not feel comfortable with the traditional method, the wood can also be charred using a handheld propane blowtorch. For many tasks we worked with this method, for example burning the windows for the facade. Precautions for this method include the mentioned safety measures and the preparation of a fire-resistant spot to place the wood during and after the process.

Starting the process, the torch needs to be lit and the gas opened to the full, so the fire appears more in a bluish colour, meaning it is more concentrated and strong. A good distance between torch and wood lays between 10-15 cm, held in a relatively straight angle. (The distance depends on the torch, but it should be around the right distance when the top of the touching blue fire separates into orange flames).


Burning process with a handheld blow torch

It is recommended to move the torch slowly over the surfaces. In the first seconds, the grains will be highlighted in a darker colour and after the whole surface will turn darker. To get the full protection characteristics, the surfaces should turn completely black and the very first layer should start to get porous. After finishing all the surfaces, the wood needs to cool down.


The burning process

Charred board

FINAL FINISHING FOR CHARRED WOOD
(applicable for traditional and hand torch technique)

After charring the wood, one can clean it softly using a standard wire brush to remove the most superficial char and create a non porous surface, using the brush in the direction of the wood grain. This task needs some precaution. If the wood is brushed too much, its pores will be opened up again and thus the water protection layer might be lost. It is enough if the excess of the burn is removed and the texture of the drains become slightly visible. After the surface can be cleaned with a cloth or water or by using an air compressor. As final coating applying linseed oil is recommended (see the advantages of linseed oil more up in the article). 

CRITICAL CONCRETE CHARRING STATION
(Shou Sugi Ban without gas)

At Critical Concrete, we wanted to build up a tool with commonly available materials which enables us on the one side to charr wood of different sizes and forms effectively, but on the other hand, keep the process at very little risk and environmentally-friendly. Check out our Video about our very own Shou Sugi Ban Charring Station!

BORAX

UseProtectionLimitationInterior woodagainst pests and fungi
against humiditynot suitable for exterior wood (only combined with another technique or with a weather-proof resistant wood spieces)
Borax crystals
Borax Crystals

Borax is composed of naturally occurring minerals that usually comes as a white powder, consisting of soft and colorless crystals that will dissolve in water. The structure of the boron, salt and oxygen molecules inhibit the metabolic processes of many organisms and therefore borax disinfects and kills unwanted pests and insects [4].

Be aware, that even if borax is a completely natural product, it doesn’t mean it is completely safe to manipulate. For sensitive people, contact with borax may lead to skin or eye irritation [5]. Even though borax enhances the woods protection against humidity, borate protections are only suitable for indoor wood that is protected from weather.

To prepare the solution, the mineral needs to be dissolved with water. We experimented on different percentages and concluded that the mix of 10% of Borax and accordingly 90% of water seems to be the most suitable division. When doing the mix, the water should have a temperature of around 40 degrees, so the mineral dissolves faster and in a higher quantity into the water.

Before applying the borax-mix, the wood needs to be cleaned with a wet but tightly squeezed fabric (to prevent the wood from absorbing more water) to remove dust and dirt. Just before putting the borax-water mixture, it has to be stirred again, because the solution will start settling after some time. To ensure not to apply too much water to the wood and to avoid running noses, it is recommended to wipe off any excess liquid of the paintbrush. To guarantee the effect of the borax minerals, a preferably homogeneous coverage is important. The borax must be fixed with a layer of oil, stain, lacquer or wax. (Look at the next step where we explain why and how you should use linseed).

We have to admit that using Borax as a termite repellent is the best solution we found so far, but that from a sustainable point of view it is far from perfect. The biggest and commercially most important sources of Borax are found in California and Turkey; minor resources can be found in Romania, Bolivia, Chile and Tibet. For us in Portugal that means on the one hand long transportation ways and its unsustainable consequences. But on the other hand and probably much worse the exploration of the minerals from deep layers in the earth can cause immense and devastating damage to nature and landscape. For this reason we are investigating alternatives such as wood ash mixes.

ORANGE OIL

UseProtectionLimitationInterior & exterior wood,
termites-infested woodagainst dry wood termites

Besides borax, orange oil has to be proven environmentally friendly repellent. Deriving from the skin of an orange peel it saturates the wood and gives it a shiny appearance. Thus the efficiency of orange oil against termites is debated. Some sources declare that it kills dry wood termites, but it fails to fight subterranean termites [6]. We applied little amounts of orange oil several times in a row to localized termite infections with a serine and in our case orange oil proved to be very effective. Orange oil is expensive (4 liters for around 100 €) but you never need a big quantity. For small surfaces and already infested areas it is a proper substitute for borax.

In our project we also use 5% mix of orange oil with linseed oil to protect our interior wood from future infestation. But bear in mind that if the borax will remain on your wood permanently, the orange oil would probably slowly be absorbed and loose effect with time. To our understanding it works better as a treatment than as a preventive measure.

LINSEED OIL

UseProtectionLimitationInterior & exterior Woodagainst humidity
sunlight-protection

Linseed oil exhibits many advantages and thanks to its non-toxicity and its environmentally-friendly characteristics is coming back into force lately. It can be used inside and outdoors and act as a protection for water and sunlight [7].

It penetrates deep into the wood, so it does not only saturate the surface but the whole piece of wood. It is also suitable to lock the layer of borax. It lends a golden hue to the wood which will turn to amber over time. The colour is a question of taste and due to its long drying time linseed oil may not be everyone’s favorite. But in fact, it is possible to reduce drying time by using double boiled or polymerized linseed oil [8].

Comparing wood
Comparison between a beam with and a beam without linseed oil

To apply linseed oil is very easy, a surplus of oil needs to be wiped off from the brush before applying it to the whole wooden surface and after it needs two to three days to be completely absorbed by the wood.

Linseed oil has the advantage that it penetrates relatively deeply into the wood. But it is also possible to replace all the air contained in the wood with linseed oil. The technique uses first a vacuum to cause the air in the wood to be drawn out, followed by pressuring warmed up linseed oil into the wood structure. Once the oil has hardened, the wood cells should be prevented from absorbing any moisture. For now, this technique is common among instrument makers; at Critical Concrete we did not have the chance to experiment with it so far, but we will do in a close future (stay tuned for upcoming articles).

WOOD VACUUM STABILIZATION

Usually, this technique is done by using a sealable container and a vacuum-pump. The container is filled up with linseed oil, some sources recommend a 2:1-mixture of linseed oil and turpentin. One or more wooden pieces are put into the oil, the container is sealed and and the vacuum pump is started, going to a maximum pressure of 90 kPA (for less fragile parts the optimal maximum vacuum pressure needs to be evaluated). The second phase involves compressing the air up to 75 psi and isolating the container. It is recommended to heat the oil to a temperature around 35 degrees to prevent the oil from “boiling”. The whole thing should be left like this for about a day. After, the heating can be turned down and before starting the depression the oil should cool down for a few hours. When everything has cooled down, the pieces can be taken out of the oil. It is necessary to keep the wooden pieces in a cold environment and give them a daily wipe for the following days, as the oil may continue to sweat and thus leaving ugly patches which will later on be hard to remove. After this activity has terminated, the pieces can be removed to a warmer place to speed up the drying process (which can also involve many days). It is still questioned whether this technique is suitable for bigger pieces of wood, as we could only find examples for smaller pieces (as seen in a construction context). It has to be evaluated whether the oil can penetrate completely into big pieces of wood and if yes, if it can also dry completely. Besides making the wood waterproof, the vacuum pressure treatment adds to weight, stability and resilience of the wood [9].

LIME AND WOODEN ASHES

UseProtectionLimitationContact between ground and woodagainst subterranean termitesnot applicable on wood

Both lime and wooden ashes are alkaline, and termites do not prefer alkaline environments. This mixture was already used in ancient China, where it was usually spread on the soil to kill subterranean termites, which can also be helpful to avoid wooden construction to get in contact with termites via the soil [10]. Besides, we found some suggestions to put ashes directly in holes that derive from termites. Also a study from Uganda shows that wooden ashes (sometimes mixed with pepper or cow urine) applied to the trees and soils kept the termites away [11]. For now it seems like it is not directly applicable to wooden surfaces, because the wood’s ph is usually acidic and these of ashes and lime are alkaline. Whenever acidic and alkaline components come into contact and water is present a chemical reaction will occur. It might have been possible to predict the reaction if bringing together only a few inorganic compounds, but wood consists of a multitude of organic compounds which differ even from species to species [12]. Thus, it might be an interesting field to experiment in the future.

DDITIONAL OPTIONS SUPPORTING TERMITE-FREE WOODEN CONSTRUCTIONS

Termite-eating Worms and Fungus. There is also the possibility to attack subterranean termites (which might flow over to wooden constructions) while placing a special species of microscopic worms into the soil next to the construction – Nematodes. They come as parasitic roundworms and they will quickly find and enter the host insect’s body and start eating it from the inside. Doing so, they are releasing gut and the termite will suffer from blood poisoning and quickly die. Nematodes will go on to its next victim till they cannot find any host insect anymore and then die. Similar working species of fungus exist, too [13]. If these worms may have any potential to be put directly into a wooden construction or if they will act as a pest themselves (as for example Bursaphelenchus xylophilus does to pine trees)needs further examination.

Diatomaceous Earth. Consisting of small decayed organisms, which have dried out and become razor sharp cut the sensitive, outer shell membranes of small insects. After the insect’s shell is sliced, the extremely dry particles of the diatomaceous earth actively dehydrate and thus kill the insect in a short time [14]. Diatomaceous Earth is commonly used to kill existing pests by spraying the powder to the infested areas. If and how it is applicable as a preventive protection to be applied to the wood needs to be examined.

Sunlight. Termites might die when they are exposed to sun radiation and heat. So, furniture or pieces of wood which are mobile and where indicators of termite infestation can be indicated, might be without termites after they were put for some time into direct sun [15].

Termite traps. The favorite dish of a termite is cellulose, that is why they are craving for wood and everything which is somehow made out of wood. Cardboard boxes provide an ample amount of cellulose. If the infestation of termites is apprehend, setting out a wettendend cardboard box can lure them out of their hiding. This way will probably not lead to the total extinction of the termites in one place and it needs repetition from time to time, but every termite removed is a good termite [16].

Protective measurements deriving from the construction details

The protection of wood can be enhanced the way it is – installed in the construction. On vertical boards the water can flow more easily and thus will penetrate less into the structure. Another strategy can be to work with a ventilated wood and batten structure, securing a constant ventilation on the exposed wood. This is traditionally used in barns and today adapted to many contemporary wooden construction. If possible, exposed joints, screws and nails should be avoided, reduce possible enter spots for humidity and to obviate rusty spots.

Conclusion

Due to its environmentally-friendly characteristics and its easy-to-work with features, wood is one of the most important materials in our projects. To protect this precious material and to enlarge its usable life-circle, we discovered the mentioned techniques as the most suitable for us. One the one hand, those methods enable the protection of wood with commonly used tools or with very little acquisitions. On the other hand, they not just renounce spreading toxic material into the environment, they also prove that wood can be a durable construction material, which can replace other, less sustainable materials. Nonetheless, those techniques are not exclusive when it comes to sustainable and ecological wood protection techniques, but using these methods set incentive for a more sustainable architecture.

Building a green roof
Building the green roof structure

BONUS-TRACK

Depending on if and how the wood was used before, the wood may need to be prepared before applying the protection techniques. This possibly includes cleaning and smoothing the wood. 

Notice: Before starting to work with wood, it is important to check the humidity of the wood (max. 20% – it is possible to use hygrometer or by comparing the weight of some size and species of wood). If the wood is too wet, it is not possible to work with it, otherwise all the effort will be in vain, you’ll damage your tools, and the wood is probably highly damaged already.

CLEANING THE WOOD

When using leftover wood, it most probably shows traces of its former life, including left-over nails, screws and other applications as well as old (and probably chipped and multilayered) paint. In case this “vintage style” is wanted, it is important to weigh the aspired look against to what extent the wood needs to be protected. Removing the leftover screws, nails and other applications will facilitate the following steps. To get rid of the paint, we suggest two tools: the classical scraper or a piece of broken glass.

When using the scraper, it is crucial not to use it in a steep angle, even if this may work more efficiently. Instead using it in a shallow angle and trying to get the scraper under the paint to protect the underlying wood from scratches.

Scraping paint
Scraping paint by hand
Workbench with hands
Measuring

A suitable piece of broken glass for this task has a curved side. For some kind of paint, thinner glass may be more efficient, but the thinner the glass is the more likely it is to break. Also it may be more handy when the piece of glass is a bit bigger (around 10-20cm), but depending on its thickness it is also more likely to break.

It may appear that it is easier to do this task without gloves, as it brings more precision in your hands. Before taking off the gloves, changing to more tight-fit gloves can probably solve this issue. 

Changing between scraper and different pieces of broken glass, in some areas one or the other may work better. Independently of the chosen tool, the scraping off of old paint can be either an easy task if the paint happens to be brittle and already chipping, or in the worst case it can take hours.

SMOOTHENING THE WOOD

After removing the nails the wood probably looks dirty, but also new wood may also have a layer of dirt, bark or mold covering its surface. It is important to clean the surface well to make the wood receptive to the following wood-protection treatment, for example to ensure a better infiltration of pest-protection and oil. An additional advantage of the removing of the first layers is the beautified appearance of the new wood surface.

The removal of the top layers and smoothing of the surface is achieved by sanding or planing. Of course there is the possibility to sand by hand, but unless it is not a very small wooden surface that you need to be protected, it may be really better work with a sanding machine. 

While using the sanding-machine, it is crucial to put the sanding patch or belt as flat as possible on the wooden surface (of course as long as this is manageable with the kind of surface you have). It may appear that it works faster and more efficiently when the sanding paper is touching the wood at an angle. But on the one hand it ruins the result as the surface will not turn out straight and bumps can be easily created. On the other hand, it also ruins the sanding pad at the edges.

Sanding
Sanding

Little corners, that cannot be reached with the sanding machine – or while using the machine could come close to very weak parts – need to be sanded by hand, or a multi-tool if you have one! The worn out patches of the sanding machine probably can be used for the parts which need to be sanded by hand.  

Now the wood is ready for protection!

Sources

[1] NZ WOOD “Which building material performs better in a fire – wood or steel?”, [Online] available at http://www.nzwood.co.nz/faqs/which-building-material-performs-better-in-a-fire-wood-or-steel/ (Last accessed in January 2020)

[2] Shou Sugi Ban “Shou Sugi Ban 101”, [Online] available at http://shousugiban.com/shou-sugi-ban-101/ (Last accessed in January 2020)

[3] Instructables “Backyard Shou Sugi Ban”, [Online] available at https://www.instructables.com/id/Backyard-Shou-Sugi-Ban/ (Last accessed in January 2020)

[4] ThoughtCo “The Chemistry of How Borax Works as a Cleaner (Sodium Borate)”, [Online] available at https://www.thoughtco.com/how-does-borax-clean-607877 (Last accessed in January 2020)

[5] Healtline “Is Borax toxic?”, [Online] available at https://www.healthline.com/health/is-borax-safe#safety (Last accessed in January 2020)

[6] Networx “Does Orange Oil Work for Termites?”, [Online] available at www.networx.com › article › does-orange-oil-work-for-termites (Last accessed in January 2020)

[7] The Craftsmen’s Blog “How To: Use Boiled Linseed Oil (Safely)”, [Online] available at https://thecraftsmanblog.com/how-to-use-boiled-linseed-oil-safely/ (Last accessed in January 2020)

[8] ARDEC “Linseed oil, a natural solution for Wood Finishing”, [Online] available at https://ardec.ca/en/blog/22/linseed-oil-a-natural-solution-for-wood-finishing (Last accessed in January 2020)

[9] Good Bagpipes “Vacuum and pressure oil treatment of wood”, [Online] available at https://www.goodbagpipes.com/index.php/about-me/writings/pipe-making/131-vacuum-and-pressure-oil-treatment-of-wood (Last accessed in February 2020)

[10] Abdalla House “Termite deterrents”, [Online] available at https://www.abdallahhouse.com/2009/11/termite-deterrents.html (Last accessed in January 2020)

[11]P. Kiwuso, G. Maiteki and J. Okorio “Indigenous methods of controlling termites in agroforestry in Uganda”, 2015, Kampala, Uganda

[12] Passivhaus “LA PRESERVATION DES BOIS DANS LA CONSTRUCTION” [Online] available at https://passivhaus.fr/wp-content/uploads/2017/11/traitementsalternatifsdesboisdeconstruction-1.pdf (Last accessed in January 2020)

[13] Varsity termite and pest control “All-Natural Ways of Eliminating Termites” [Online] available at https://varsitytermiteandpestcontrol.com/natural-ways-eliminating-termites/

[14] Citypests “Diatomaceous Earth for Termites”, [Online] available at https://citypests.com/diatomaceous-earth-for-termites/

[15] Pesthow “How to get rid of termites”, [Online] available at https://www.pesthow.com/how-to-get-rid-of-termites/

[16] Pesthow “How to get rid of termites”, [Online] available at https://www.pesthow.com/how-to-get-rid-of-termites/

[image by Vincent van Zeijst], [Online] available at https://commons.wikimedia.org/wiki/File:Faroe_Islands,Streymoy,_Kirkjub%C3%B8ur(1).jpg (Last accessed in January 2020)

The post Natural Wood Protection first appeared on Critical Concrete.
Did you miss our previous article…
https://www.concretestyle.net/?p=1091

Tyre Foundations

Tyre Foundations

Interested in learning more about this topic and more social and sustainable ways of doing architecture? Apply now for our Postgraduate!

jQuery(function() { _initLayerSlider( ‘#layerslider_20_gxf958i0tshu’, {createdWith: ‘6.11.2’, sliderVersion: ‘6.11.2’, skin: ‘v6’, navPrevNext: false, hoverPrevNext: false, navStartStop: false, navButtons: false, showCircleTimer: false, skinsPath: ‘https://criticalconcrete.com/wp-content/plugins/LayerSlider/assets/static/layerslider/skins/’}); });

DISCLAIMER

[This article shows the development of the first step of a new prototype experimented in Critical Concrete. During the conception of the green roof, the structure was checked by a civil engineer who also advised us in the development of our wildest prototypes.]

Check out the video to see how we experimented with scrap tyres and compressed earth&gravel for a low-impact and concrete free building! 
:ok_hand:

Introduction 

In the progress of developing our green roof prototype we have been confronted with foundations in different ways. Seeking for alternatives it turned out that the old granite walls of the building, once reinforced by wooden beams, would be strong enough to carry the load of the new roof. You can read all about the refurbishment and reinforcing of the walls for the roof in our previous articles (walls-refurbishment 1.0, walls-refurbishment 1.1, how to build a stone wall).

The size of the new roof however, stretches out further than the fully loadable walls. For that reason, part of the roof needs a different kind of foundation.

Section of Tyre foundation
Section of the green roof highlighting the parts supported by tyre foundations

Our Research

Throughout our research for alternatives to concrete, we stumbled over the tyre foundation. For us, it was very interesting since it is a low-tech solution which is composed only of scrap tyres filled with compressed gravel. Both components are easily accessible almost everywhere in the world.

Indeed, when tyres worn out, they become a waste which is not easy to handle. Recently, more processes that aim at recycling have been developed from which rubber, steel and textile fibers are obtained. Another solution is to reuse the tyres directly in a different context, thus avoiding more energy consumption for the transformation of the product.

Pile if trashed tyres
Pile of trashed tyres
Re-using the tyre
Worn out tyre reused in a new contextScrap tyres have already been tested in various cases in the construction field, for example to make the roadbed of the streets and referred to as mechanical concrete, a method widely used in the USA. One of the most known cases is the Earthship Biotecture concept autonomous houses developed by architect Michael Reynolds, in which earth-rammed automobile tyres are used for building the main retaining wall of the house. This technique is presented as the most appropriate method for its strength, economy and low need of technical skills.

Truck covering tyres with rubble

Person standing on tyre wall
Pictures by mechanicalconcrete.com (pictures on the left) and by earthship_biotecture (licensed under CC BY-NC-ND 2.0) (picture on the right)

The flexibility of the tyre can also offer durable protection in a seismic area. These foundations can indeed reduce the effect of seismic vibrations on the building on top of them and it can be used in every stable soil, even clay soil (for more information click here). Yet we couldn’t find any applications that fits exactly our needs. Many cases used the tyres to build walls, or wall-like foundations where the structure was resting without anchoring. Other examples used conventional concrete to fix some kind of anchoring sockets. As far as we know, our case, a structure with several punctual load bearing columns, has not been well documented yet.

Interested in using this technology in your project?

Critical Studio can help!

Learn More!

Our Approach

In our particular case, we designed two single stepped footings for two columns of the green roof.

Section and plan of tyre foundation
Section and plan of the two single stepped footings for two columns of the green roof

One part of the green roof structure lies on a massive, structurally stable granite wall built in the 19th century, and the other part will lay on the new foundation. Since it is a prototype and it is not well known how the foundations will react to the heavy load, we decided to make the new part (15m2) independent of the rest of the roof previously built (120m2). This assembly required us to insert an expansion joint which allows movement due to ground settlement or other variations, expansion or contraction of building materials. It will also assist the observation of potential changes and reduce the risk of damaging the whole roof in the worst case scenario. Indeed, this technique has been used in England for at least 15 years. Research and experiments of the Holy Trinity Church Tulse Hill showed that they tyre stacks will hold a minimum of 1000 kN/m2 of load with no detected movement on the expansion but a compressive variation of only 3mm (to watch the video click here). The IUT of Grenoble made tests of loading tyre foundations from the Flexagone office: They applied the weight of pressure of 72 tons on the foundation, without any damage or detectable movement (for more information click here).

Additionally we consulted several engineers to check our structural conceptions. As we explained in former articles, the heavy loads on the roof – composed of the drainage layer, earth and plants – impacts the renovation process by its load of 600 kg/m2– 5.88kN/m2, including the dynamic load. Based on this information and our needs, we developed the concept of single stepped footings for columns. We calculated that each pillar should carry about 2400kg approximately. The foundation includes a socket which joins it with the wooden column.

Side view of foundation
Section of the Tyre Foundation

This connection is especially important while setting up the tyre and aligning the structure. Once the roof is finished, its own weight will hold its place. Below the foundation is a metal plate. On one hand, it distributes the forces on the soil and on the other hand it connects the foundation to the holding socket of the column. On top of the metal plate lay the tyres. We chose two tyres to make the foundation strong enough for the load. One truck tyre (95cm ø) and a smaller car tyre (65cm ø). The holding socket for the column is layed on the upper tyre and connected to the foundation through threaded rods which are welded to the base plate. The socket itself also holds the column in the right position.

Our workexplained step-by-step

This guide is an overview of every step we took in building our prototype of the tyre foundation. Since it was our first attempt, not all of our processes are optimized and need further development. However, this should serve as an inspiration for anyone with a similar situation and is open for discussion and improvement.

Beforehand a list of tools we used
in the progress:

welding machine,crowbar,grinder,hammer,wheelbarrow,bench drill,shovel,cutter.

Throughout each phase, we remind you that it’s important to protect yourself using appropriate safety equipment.

For this, you will need:

helmets,protective goggles,appropriate protective gloves,security shoes,reusable dust masks.

Preparation of the ground

The first and most important step before starting any foundation is the analysis of the ground. The soil has to have a sufficient bearing capacity. If the soil is not suitable there are different possibilities like reinforcing the soil, digging deeper, or adapting the foundation type to a wider tyre for example. In our case, we needed to dig until +/- 70 cm under the floor level to find a proper soil. We decided to put a layer of 5 cm of compressed gravel, frequently used under footings to have a correct level.

Estimated time: 6 to 8 hours per pit,
depending on the toughness of the ground

Woman levelling ground
Leveling the ground of the pit

The base metal plate

The metal plate is the base of the foundation and serves as a solid surface for the tyres. We chose a thickness of 2 cm. To have the plate and also the column connected to the foundation we welded 4 threaded rods to the plate. The socket will be attached to these rods later on. Before putting the plate in the pit we put a breathable and waterproof membrane supposed to protect the plate from humidity in the ground. An EPDM membrane might have been a more suitable choice to increase the durability of the protection. We tried to wrap the plate as well as possible. Additionally, we painted the base plate and especially the weld joints with anti-corrosive paint. We still don’t know how this will react with the time, neither if it is going to be efficient enough to protect the welds. Our main objective is to take all the necessary precautions to avoid that water eventually permeates and settles at the bottom of the foundation. In our next tyre foundation build, we would consider drilling some holes in the metal plate to allow for the draining of water infiltration. The use of this metal plate was advised by our engineer to level the ground on which the foundation itself would set, but we didn’t find any other project using a similar precaution. It was also helpful for us to link the column to the foundation on a robust way.

Metal plate wrapped with membrane

Estimated time: 2 to 6 hours,
depending on accessible tools to cut the plate on the good dimensions

Metal plate on the ground of the pit

Preparation of the columns

The columns we used are made out of two 12×24 cm construction plywood beams. To join the two pieces we glued and screwed them together. The section is therefore 24×24 cm. To protect the wood from fire, water and pests we applied a layer of wood ash on the tyre, as well as protected the wooden column with a layer of borax, known as a protection against mold and repellent against insects. For a specific protection to prevent a specific termite attack, we paint the column with a mix of essential orange oil (5%) and linseed oil (95%). We will soon dedicate a detailed article to wood protection from fire, water and pests.

Estimated time: 2 hours.

Preparation of the socket

We used a steel socket to fix the column with the foundation. The socket is connected to the foundation with four threaded rods. It is fundamental to align properly the rods after putting the base plate, so that the columns would be aligned to each other. We used a wooden guide to secure the rods’ position while filling the tires. This guide is composed of two pieces that represent the two plates, with the holes for the threaded rods, and a long bar that helps to maintain them aligned and in place.

Metal plate on the ground of the pit

Estimated time: 4 to 6 hours,
depending on accessible tools to cut the steel and drill the holes.

Tyre foundation alignment
Checking the alignment

Filling of the tyres

In its rawest form, the tyres can only be filled with earth. Lots of case studies for earth filled tyre foundations are in relatively dry climates where the temperature doesn’t go below 0°C. It is preferable to use an other sub-grade as gravel or other material to encourage drainage and allow for water expansion, and then avoiding some major instability in the ground caused by frost. We decided to choose gravel made of local accessible granite, from the North of Portugal. We had the choice of three sizes of gravel. After some discussions with our engineer, we decided to order the smallest to have better cohesion. We also added some sand to create a mix with better bonding and leave no empty space between the gravel. We used the ratio of two parts gravel to one part of sand (2:1). The mix in the tyres has to be then as compressed as possible. At first, the tyre can be filled with a shovel and by hands. When it is not possible to get any more of the mix in, a crowbar and a piece of wood can be used to open the tyre (see how they did at the Holy Trinity Church Tulse Hill). Once held open, a second person can continue to fill up the space with the mix. A piece of wood can be used to shove the mix in as deep as possible and a hammer to compress it. This needs to be done until the tyre is inflated and no more mix can be added. The foundation is now ready for the socket.

One member of the CC Team inside a tyre.

Filling a tyre with gravel.

Filling a tyre with gravel and compressing

Estimated time: 6 hours for two people to fill the 2 tyres for one foundation
(a truck and a car tyre).

Installation of the socket

The steel socket which is holding the column is made out of three pieces of steel. The objective is to obtain a socket that correctly holds the column. We thought about different forms and finally settled with a “U”-form, that could maintain the feet of the columns and be correctly fixed to the lower part of the foundation.

Metal flanges on base plate
Base plate

The first part being the base plate (30x30cm), which has four holes to be fixed with the threaded rods of the foundation. The holes of the plate have to line up with the position of the threaded rods and should be 1mm bigger than the diameter of the rods to facilitate their insertion. Our rods were 12mm diameter. The second part being the two steel brackets (15x20cm), which are welded to the plate and hold the column with two horizontal threaded rods. The individual steps of this process are explained below.

Drill metal plate
(1) The holes in both of the brackets, which should be shifted, can be drilled and should be at least 2-3mm bigger than the rods.

Plate and flange
(2) Afterward, the first bracket can be welded on the base plate.

Drill flange to timber column

(3) The piece, that results from this step can be used to mark the position of the holes on the wood of the column. For this, half of the steel socket can just be laid on the column.

Column sitting on base
Image

(4) It might be necessary to cut a little edge of the column so there is some space for the weld. After marking the holes, they can be drilled also 2-3mm bigger than the rod. The bigger the holes are, the more room there is to adjust and compensate for potential inaccuracies.

Column on base

(5) The next step is to find the right position for the second bracket. For this, the socket can be laid on the floor, and the column can be put on it. The rods can be stuck through the holes of the first bracket, the column and the second bracket, which is not fixed yet. Also, the bolts can be put on and tightened.

Sketch of steel base plate
Column steel base plate sketch

(6) The second bracket should now touch the base plate and there should be no gap. If it doesn’t, any holes can be drilled bigger to make it fit properly. If it fits, it can be fixed by welding on 4-5 small points. Afterward, the column can be removed. The second bracket should be in the right position and can now be welded on completely.

Estimated time: 5 hoursto install the socket: drill, weld and adjust.

Installation of the columns

Once the socket is welded together in the “U”-form and the holes are drilled, the foundation is ready to receive the columns which have a section of 24×24 cm.Having an even level foundation is crucial and is something to pay extra attention to, during all the process. First, we used the spirit level to check the level of the lower plate, to ensure that the tyre will be placed on level ground. Indeed, it is important to keep in mind that the column will apply a heavy load that needs to be properly transferred to the foundation. For the next steps, the laying of the tyres and the fixation of the socket, make sure to always keep checking the level and the alignment of each foundation.

Metal base plate
Checking the level of the metal plate

Estimated time: 2 hours.

2 men working in workshop
Preparing the columns

The retaining wall

In our case, one of the foundations is positioned under the level of the earth, in an outside environment, that forced us to find a solution for the rainwater not entering inside the workshop space. A retaining wall has been constructed to withstand lateral pressure of soil, due to earth and rainwater. There are a lot of different retaining walls, used for different situations for example the gabion retaining wall or the cantilever retaining wall.

Building retaining wall
Building the retaining wall

In our case, we built a gravity retaining wall that depends on its self-weight only to resist lateral earth pressure. Commonly, this needs to be of large proportions because it requires a significant gravity load. We constructed the wall from granite stones that we had acquired from previous deconstruction of old walls. To protect the column from water infiltration, we bonded the stones with a lime mortar mix.

Furthermore, we plan to realize a drain which prevents rainwater from entering the basement. Parallel to the retaining wall, it will collect excess water and runs it through a pipe into a sump away.

Cost and Time Comparison

Since we are using the tyre foundation instead of a concrete foundation, the comparison of cost is a crucial point. For this reason we compare only the part of the foundation which is replaceable. The socket and the column are therefore not part of the comparison, since they are the same for both versions. We already pointed out the factor of sustainability, which is our driver in this matter. But what does this mean from an economical point of view? A tyre foundation in its simplest form is only made from dirt and scrap tyres and is therefore basically free. This method is suited for retaining walls and foundations that don’t require anchoring. Our Approach of a highly stressed single step footing which includes anchoring cost approximately 125€ compared to the concrete version of approximately 28€. As the calculation shows, the major cost factor is the metal plate which is also an open question for us. Its necessity is not completely clarified wherefore we are looking for alternatives which even out differences in price and make the single step foundation an economically competitive alternative.

Table showing cost and comparison

It is to be added that the concrete should be mixed homogeneously by a cement mixer rather than by hand, and that welding the steel reinforcement takes some time as well and electricity, and quite a few welding electrodes. In terms of time, the concrete takes at least 7 days to set sufficiently for a foundation in order to set-up the column, but is faster to make, comparatively.

Conclusion

In the process of finishing the green roof, the application of the tyre foundation has been challenging but successful so far. It is carrying the roof structure but needs further observation as to how it will react under the full load of the green roof including soil and vegetation. To be able to observe any kind of movement we installed a measuring unit that we will control regularly.

Measuring settling of tyre foundation
Movement measurement
How to store food outside of the fridge
Sustainable Satisfaction? 

Concrete is an extremely popular material for construction and can be found in most parts of the world. Today concrete is the primary material used for foundations because of its many positive attributes: it is strong in compression, it is flexible as it can be poured into adapted forms and sizes, it can be applied in situ, it has good fire resistant qualities. However, the production of Portland cement, an essential constituent of concrete, leads to the release of significant amounts of CO2 and other greenhouse gases. Because of limited natural resources, such as sand, and the output of greenhouse gases, concrete production is not sustainable and therefore requires alternatives in the construction field. A possibility is to use recycled materials which have low energy costs, high durability and low maintenance requirements and therefore a small impact on the environment.

The single step footing foundation represent a viable and affordable alternative method we are looking forward to developing and using in further projects.

You want to see more? Check out the video to see how we experimented with scrap tyres and compressed earth&gravel for a low-impact and concrete free building! 
:ok_hand:

Sources

[Ar. Bindu agarwal, Ar. Aanchal Sharma] “Reuse of Waste Materials: A case study of Earthships”, in: International Journal of Science, Engineering and Technology Research (IJSETR) Volume 6, Issue 10, October 2017, [Online] available at: http://ijsetr.org/wp-content/uploads/2017/10/IJSETR-VOL-6-ISSUE-10-1364-1369.pdf (Last accessed in December 2019).

[Architecture 2030] “Buildings generate nearly 40% of annual global GHG emissions”, [Online] available at architecture2030.org/buildings_problem_why/ (Last accessed in December 2019).

[Andrew, Robbie M.] “Global CO2 emissions from cement production, 1928–2018”, CICERO Center for International Climate Research, [Online] available at: https://www.earth-syst-sci-data-discuss.net/essd-2019-152/essd-2019-152.pdf (Last accessed December 2019).

[Decorex Pro] “Technology for the construction of the foundation of tires”, [Online] available at: /en.decorexpro.com/fundament/iz-pokryshek/ (Last accessed in December 2019).

[Department for Business, Innovation and Skills London] “Estimating the Amount of CO2 Emissions that the construction industry can influence”, [Online] available at: https://assets.publishing.service.gov.uk/government/uploads/system/uploads/attachment_data/file/31737/10-1316-estimating-co2-emissions-supporting-low-carbon-igt-report.pdf (Last accessed in December 2019).

[Deva Racusin, Jacob; McArleton, Ace] “The Natural Building Companion: A Comprehensive Guide to Integrative Design and Construction”, 2012

[Flexagon Office] “Fondations et plots”, in: La Maison Ecologique 67 – fevrier et mars 2012, [Online] available at: http://yourtes.net/fichiers/Fondations%20et%20plots%20-%20La%20Maison%20Ecologique%2067%20-%20fevrier%20et
%20mars%202012.pdf (Last accessed in December 2019)

[Holy Trinity Tulse Hill on YouTube] “Packing Car Tyre Foundations (Car Tyre Foundations #4)”, [Online] available at: https://www.youtube.com/watch?v=0YV2TG5aypw (Last accessed in December 2019)

[Holy Trinity Tulse Hill on YouTube] “Car Tyre Foundations Plate Test”, [Online] available at: https://www.youtube.com/watch?v=K8Vlz6qNCfU (Last accessed in December 2019)

[König, H., Weissenfeld, P.] “Entretien écologique du bois”, ed. La plage, 2008.

[Lowimpact] “Why cement should never be used with natural buildings”, [Online] available at: https://www.lowimpact.org/why-cement-should-never-be-used-on-straw-bale-houses/ (Last accessed in December 2019).

[Mechanical Concrete] “Award Winning, Economical, Green, Industrial Strength, Construction Technology”, [Online] available at: http://www.mechanicalconcrete.com/ (Last accessed in December 2019]

[Miteco] “Descarbonatac fabrical”, [Online] available at: https://www.miteco.gob.es/es/calidad-y-evaluacion-ambiental/temas/sistema-espanol-de-inventario-sei-/040614-descarbonatac-fabric-cal_tcm30-429852.pdf [Last accessed in December 2019)

[Miteco] “Combust fabricamento”, [Online] available at: https://www.miteco.gob.es/es/calidad-y-evaluacion-ambiental/temas/sistema-espanol-de-inventario-sei-/030311-combust-fabric-cemento_tcm30-430164.pdf (Last accessed in December 2019)

[Naik, Tarun R.] “Sustainability of Concrete Construction”, [Online] available at: https://ascelibrary.org/doi/abs/10.1061/%28ASCE%291084-0680%282008%2913%3A2%2898%29 (Last accessed in December 2019).

[Russian Patents] “Module-type anti-seismic protective unit for buildings and structures”, [Online] available at: https://russianpatents.com/patent/225/2250308.html (Last accessed in December 2019]

[World Green Building Council] “New report: the building and construction sector can reach net zero carbon emissions by 2050”, [Online] available at: ww.worldgbc.org/news-media/WorldGBC-embodied-carbon-report-published (Last accessed in December 2019).

The post Tyre Foundations first appeared on Critical Concrete.
Always check our latest articles at…
https://www.concretestyle.net//category/politics

Gutter Cleaning Service Will Keep Your Gutters Clean

Gutter Cleaning Service Will Keep Your Gutters Clean

Gutter cleaning is often the most critical aspect of maintenance for residential roofs. Without it, the water that collects in your gutters eventually seeps into the foundation of the house. It also flows off into the yard, which may end up spreading mold or causing other damage. That’s why gutter cleaning should be done regularly. If you think that your roof needs to be cleaned, Visit Website or call us to come out and give you an estimate.

gutter
 

A gutter cleaning service will usually quote you a price per square foot. The average cost for downspout and gutter cleaning is around $ 160 or somewhere around $ 120. The amount you pay depends on many factors, such as the condition of the gutters and your home’s height. To get an average estimate, use the average square footage or linear feet of your home. Then multiply that by the number of square feet to get the price per square foot.

Some homeowners mistakenly think that they have to clean their gutters every three months or so. While this might be necessary to remove large pieces of debris, it is better to do it at least once a year. It will save you time and money by preventing damage from occurring. A gutter cleaning service can easily remove leaves, twigs, pine needles, and any other type of debris out of your downspouts. They will also inspect the gutters and remove any broken or bent sections.

Some homeowners feel like they can handle the job themselves. But doing it on their own might cause more damage than good. You could miss parts of the gutter cleaning service installation process, which could cause damage to your roof, gutters and shingles. You could cut corners by using inferior materials or cutting corners when it comes to quality materials. By avoiding all these things, you will not only save yourself money but you will also be protecting your roof and home from damage.

When you hire a professional gutter cleaning service company, they will take it a step further. Instead of just checking your gutters for damage, they will closely examine them for leaks or damage. They will also check your attic for leaks or cracks and make sure they don’t need to be repaired. If there is a problem with your gutter installation, your gutter cleaners will come and repair your roof or fix any cracks in the attic.

One of the most important parts of gutter installation is the fascia board. It protects your shingles and adds a finished appearance to the roof. Professional cleaning services will use high-pressure water jets to clean the fascia board and get rid of leaves and debris. If you have an asphalt shingle roof, the damage could be limited to cracks or small leaks, which are easily fixed.

Professional cleaning services will use their expertise and training to repair your roof. They may suggest that you repair the damage yourself if you are not comfortable doing so. However, this can be extremely dangerous for your home and could potentially cause even more damage. The professionals can also recommend the best window products for your specific situation, allowing you to enjoy longer-term relief from your gutter system.

By hiring a professional, your gutter system can be fixed quickly and efficiently. The cost of having your gutters cleaned will be far less than the additional time and labor required to replace them. This will allow you to have the peace of mind you need and save the money you would spend on repairs. You can prevent the gutters from becoming damaged by checking the quality of the screens and struts at least twice a year. This will help you avoid having to pay for the damage caused by leaf debris and extra wear and tear on your gutter system.